
Gift Card Holder project 5 from Christmas Card Class

Christmas is a great time to give Gift Cards - and a hand made fancy card is the best way to dress up this gift.

the Front
This is an easy design which I modified to metric measurements for our Australian market.  ( the Paper Pixie has US measurements for this design)

The inside

This is a picture heavy post to give you the instructions.

You only need one strip of DSP but I have given the measurements in both metric and imperial as it is a good design to use your 6x6 DSP.

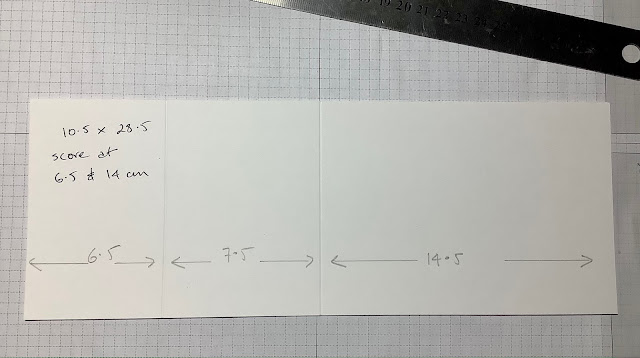
1. Score your cardstock at 6.5 and 14 cm, this gives a 6.5cm panel, which will fold to the inside and hold the gift card, a 7.5 cm panel which will be the card front, and a regular panel 10.5 x 14.5 for the inside panel where you will write your message.

2. cut your DSP strips as per the table above,  and cut your cardstock pieces 10 x 14 for the writing panel inside, and 9 x 9 for the card front.


3. adhere the 2.5cm strip to the sentiment panel and adhere to the inside of the card.

4. on the card front adhere the two DSP panels as shown. ( 7cm DSP to 7.5cm panel, and 6cm DSP to 6.5cm panel)


5. using a label punch/ oval punch/ circle punch cut a small shape from the edge of the card where you will be able to see the gift card peeking out, and be easily able to remove it from the card. Fold this 6.5cm panel to the inside and adhere just along the top and bottom edge to create the pocket.


6. on the front of the card adhere the 9x9cm square and decorate as desired.

And here's a few more examples.


And here's a sample using Merriest Moments Stampset in completely non Christmas colours as an example of a birthday or other occasion card.


I really hope that you give this a try, it's super easy

I hope you have a creative week and remember, 
"don't just post online,
 post something pretty!"
cheers, Liz


Comments

Popular posts from this blog

Envelope Dies perfect for an Acetate Tent card and some new DSP

After creating yesterday's cards I was on a roll and created this one using the beautiful Gilded Autumn DSP and the Fancy Phrases stamp set.  I really love the sentiments in this set.  It is such a simple design and easy to create. You can find all the directions on yesterday's post for Just Add Ink (JAI#518)  I watercoloured the white leaf after I had adhered the gold veins just to soften it, and I added a strip of mint DSP to the front of one of the tent stands as the white was a bit stark. That's the cool thing about this design, you can change it up plenty of ways. I'm sure we can all send these type of cards at the moment. I hope you are safe and well, and staying connected, wherever you are. I hope you have a creative week and remember,  "don't just post online,  post something pretty!" cheers, Liz Product List Ornamental Envelopes Bundle [ 155168 ] $83.50 Envelopes  Dies [ 153531 ] $63.00 Shimmery White A4 Car...

Funky Folds Blog Hop= a Bay window card using Country Flowers

Well it's been a very long time since I participated in a blog hop - and it feels good to be participating in a FUNKY FOLDS hop. You may have come from Jan McQueen's creation, or you may be starting here. Be sure and hop all the way around. I do love Fancy Fold cards and of course with a new catalogue and new products it is fun to be creating again. I have a big weekend retreat coming up in a few weeks and we are using the Country Flowers Stamp set so I am creating a swag of samples. Since time is such a precious commodity for all of us I am using some old favourite folds with new products - a whole new lease on life. For this week's hop I am revisiting the Bay Window Card. The front tri-panel piece bends forward and tucks in behind the little anchor which is fixed to the inside. Your card will stand up unaided. This is it with the edge tucked under the anchor. You can find the measurements and instructions and several previous samples on these pages. Today's card featu...

500 challenges at CASEing the Catty ' - how fantastic to be involved

What an honour to be invited back to join with the Caseing the Catty team for their 500th challenge! Thankyou Bec for thinking of me. I started with the CTC crew way back at the beginning and I still go to the catalogue as a ready reference for creative ideas. The earliest post I can find is 2014 - CTC#3! 10 years of crafting along, that's pretty amazing. For this challenge it was completely open to choose any project to  CASE from either the annual or the Christmas mini catalogue. There are lots of projects in there that spark a creative journey for me and I did have a hard time choosing. In the end I opted for something simple since none of us have much free time at this hectic time of year. To make things a tad more difficult I have covid so feeling pretty low on energy. Lucky that crafting is a relaxing pastime and I can sit at my craft desk without be scolded too much by my loving DH that I need to be resting! For my projects I have created a Christmas Card and a matching Gift...