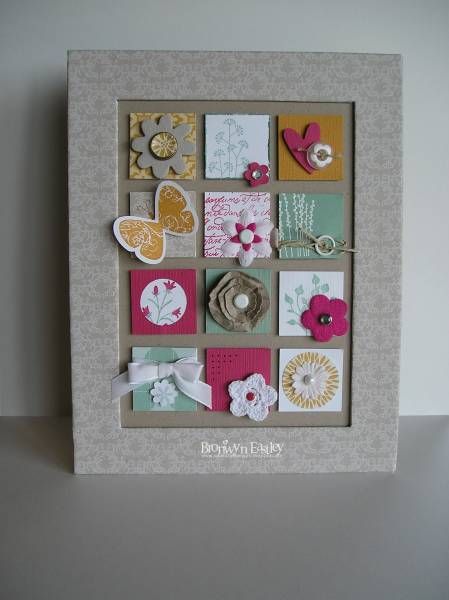
Bronwyn's 60th Birthday Blog hop #6 inspired by a very Old distinktive dsigns project

 Bron's 60th Birthday Blog and INSTA Hop #6 - Tropical Holiday

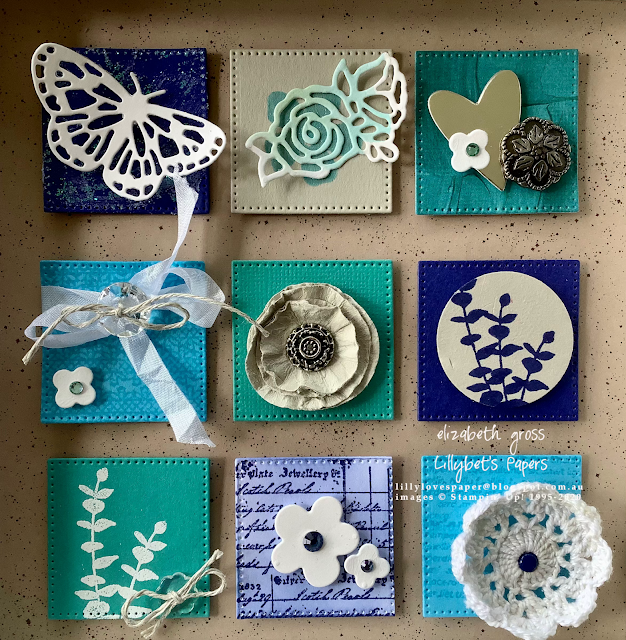
The theme FOR #6 is "Tropical" to celebrate Bron's actual birthday. - She's enjoying the beautiful Tropical North Qld. Aren't the colours gorgeous in a tropical ocean - that's what I've used for this project. Bermuda Bay, Sahara Sand, Tahitian Tide and Starry Sky.


I have decided to use the tropical colours, but wanted to replicate the very first project of Bronwyn's that I fell in love with. It's from Just Add Ink Challenge #4 - one from the archives, since now they are up to #616!!!


I have always been attracted to a grid layout and I still find lots of visual interest in this project, so I have recreated snippets of it for my shadowbox frame. Pocket Silhouettes was one of my first Stampin' Up! purchases and I still have it and love it, but I used current stamps for this project - Framed Occasions, and Ranunculus Romance.  I also used  bits and pieces from my stash including shimmer embossing paste, Brads, Buttons, Rhinestones, Dies and a miniature crochet doily (much like Bronwyn's) that an old friend made me years ago. Of course it had to include a butterfly, since many of Bronwyn's projects have butterflies in them


I left the glass out to take the photos but this frame will sit easily on a shelf / table.


Wishing many happy returns to Bronwyn for her big birthday. 
I am very grateful for all the inspiration and encouragement she has given so freely over the years. I really hope the tropical holiday has lived up to her dreams. 
May your weekend have a holiday vibe too.

Next on the blog is Vicki 


thankyou so much for stopping by, 

I hope you have a creative week and remember, 
"don't just post online,
 post something pretty!"

cheers, Liz


Product List
Heat Tool
[129056]
$53.00

Comments

  1. Oh, wow! What a stunner! Your shadow box looks amazing. I'm a big fan of the grid look too, and you've absolutely done it, and Bron's card, justice.

    ReplyDelete
  2. WOW I love your shadowbox! The colours are perfect as are all the little bits you have included. I love pocket silhouettes too!

    ReplyDelete
  3. Stunning project Liz! And the colours you've chosen are perfect for our theme and so nicely put together.

    ReplyDelete
  4. Liz, your shadow box looks amazing and it's such a thoughtful and wonderful way to celebrate Bronwyn. Gorgeous colour combination too!

    ReplyDelete
  5. What a great idea to CASE one of Bronwyn's own projects for this hop - it's a real tribute.

    ReplyDelete
  6. Your shadow box is absolutely stunning Liz and the level of attention to detail is wonderful. To recreate a project of Bronwyn's for this hop is such a fabulous idea and a beautiful way to honour her.

    ReplyDelete
  7. oh WOW what an amazing work of art- love all the details and perfect touches. YOu're so thoughtful!!

    ReplyDelete
  8. Oh my word, Liz, I was so 'taken back' with your gorgeous take on a very old project of mine. It was one of my faves way back in 2010. I'd just started my 'gig' at Just Add Ink. Your version is just beautiful. Thanks so much for joining in with my birthday blog hops this year. x

    ReplyDelete

Post a Comment

Thanks so much for taking the time to comment. I really appreciate it,
In line with new Data Protection legislation (GDPR) by commenting you do so in the knowledge that your name & comment are visible to all who visit this blog and thereby consent to the use of that personal information for that specific purpose.
Liz

Popular posts from this blog

Envelope Dies perfect for an Acetate Tent card and some new DSP

After creating yesterday's cards I was on a roll and created this one using the beautiful Gilded Autumn DSP and the Fancy Phrases stamp set.  I really love the sentiments in this set.  It is such a simple design and easy to create. You can find all the directions on yesterday's post for Just Add Ink (JAI#518)  I watercoloured the white leaf after I had adhered the gold veins just to soften it, and I added a strip of mint DSP to the front of one of the tent stands as the white was a bit stark. That's the cool thing about this design, you can change it up plenty of ways. I'm sure we can all send these type of cards at the moment. I hope you are safe and well, and staying connected, wherever you are. I hope you have a creative week and remember,  "don't just post online,  post something pretty!" cheers, Liz Product List Ornamental Envelopes Bundle [ 155168 ] $83.50 Envelopes  Dies [ 153531 ] $63.00 Shimmery White A4 Car...

Funky Folds Blog Hop= a Bay window card using Country Flowers

Well it's been a very long time since I participated in a blog hop - and it feels good to be participating in a FUNKY FOLDS hop. You may have come from Jan McQueen's creation, or you may be starting here. Be sure and hop all the way around. I do love Fancy Fold cards and of course with a new catalogue and new products it is fun to be creating again. I have a big weekend retreat coming up in a few weeks and we are using the Country Flowers Stamp set so I am creating a swag of samples. Since time is such a precious commodity for all of us I am using some old favourite folds with new products - a whole new lease on life. For this week's hop I am revisiting the Bay Window Card. The front tri-panel piece bends forward and tucks in behind the little anchor which is fixed to the inside. Your card will stand up unaided. This is it with the edge tucked under the anchor. You can find the measurements and instructions and several previous samples on these pages. Today's card featu...

CTC#116 Inspired by Pages 20-31

Welcome back of another week of CTC. This week we are CASEing quite a big section of the catalogue-pages 20-31, which includes the Oh So Succulent suite. I love the succulent set but need a lot more time to play with it. (I'm sure you can all relate to that!) I also love little square notecards like the one on page 31, so I had a little play and this is what I came up with. This week I've done the step it up system again. This is a lot of fun and a process which can help you analyse your own style and how to adapt that for classes or workshops to appeal to a wider range of styles. This week I am stepping it up from simple stamping directly onto the notecard, then building on that with another colour, added layers and embellishments. Although the twine doesn't carry through from the base card it needed a little bit of black to tie them all together. Beginner Crafter  - very simple stamping and minimal supplies - 1 colour of Cardstock (Thick Whisper W...