Welcome to the CASEing the Catty Sunday night blogshop where we use a section of the Catalogue to inspire this weeks projects. Designers can take a layout, a colour combination, or any element as the starting point to create something new. We invite you to tour around the hop and to join in -after all the Catalogue has so many beautiful samples to inspire us all. If you get lost you'll find the full crew here



This week we are using the samples from the Artistic Expressions section (which is another huge section) from pages 92-157. Because this is such a big section we will revisit it in a few weeks. You may have arrived from the talented Julia, or you may be starting here -either way, take a tour and enjoy the inspiration.

But for this week I have had a bit of fun making shaker cards!
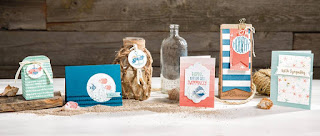
I love blue card second from the left in this shot and thought it would be perfect for a shaker, and I also had some paper left from the Pretty Petals stack which reminded me of the ocean so I combined the two. We made this card at my shaker cards class last weekend and everyone loved it. The Seaside Shore Stampset is super easy to use and very effective. The nice thing about this card is that it only used two colours as well. We made quite a few variations on this design - some were embossed, some vertical, some had the fish on the outside, some on the inside. I did a lot of research and practice trying to work out the best method for the shaker elements and so this post also contains a little picture tutorial for those ladies who came along and had never done shakers before.


I have tried lots of methods with shakers and have had variable success with the elements - I have had static issues with the window sheets and the elements - particularly sequins sticking to the window and not shaking. I tried cleaning with alcohol, with used drier sheets and all manner of elements, but the single biggest success was to simply wash the window with soap and water just before you assemble the shaker. I also find that beads are heavier than sequins and shake a lot better. So I raided the dancing costume archives in my craft room and added beads, and a little glitter. I tried small punched stars in glimmer paper with limited success too, but maybe they were just too small.
For me, I found the easiest way is to
- stamp your images on your background piece, which is just slightly smaller than your front frame
- wash the window and adhere to the frame with a thin bead of tombow- don't have your glue too close to the edge of the frame as you don;' want the glue to squish through to the front.
- Apply the foam strip a little way from the inner edge of your shaker. Run your fingers along the 'side walls' of the strip as you go to make sure any sticky bits there are "blunted" so your elements don't stick to the wall.(well minimise that a little)
- pile your shaker elements onto the window before you take the backing strip off- once you stick card to these strips they stay stuck!!!
- carefully place the backing piece over
- now you are ready to stick it in place


And here's a few of the cards some of the girls made.


And just to show you the same layout with a set you may already have in your collection I used the Gratefull Bunch set for this one - circles are a bit trickier! - and I may have used a few too many beads here!!! I have two of the small flowers inside this shaker but one of them got stuck anyway!!


Thanks so much for looking, I hope you give shakers a try soon. Next on the hop is Simone, so hope on over and check out her creations
Don't forget we love to see what you create too, and we hold a monthly challenge where you can share with us too.
Thanks so much for looking,
Liz
Wow Elizabeth, you have made so many fun shaker creations. I love that you raided the costume archives for the beads. I really like the beads in the fish card as they remind me of bubbles!
ReplyDeleteLove both of your wonderful creations, love how you have made them into shaker cards, thanks for adding the tutorial I am going to have a go at this!
ReplyDeleteFabulous shaker cards Liz & such handy tips. I don't have any beads but they look so pretty, so I'm going to buy some as I'm totally in love with shaker cards at the moment! Kelly x
ReplyDeleteWhat gorgeous cards Elizabeth. I love the colours the movement, the shakers, everything! One thing you might try to cut down on the static is to rub your embossing powder budding over the inside of the window sheets/acetate before you add your beads and sequins. It worked for me and I was frustrated with the sequins and beads just sticking to the window sheets and not moving. Thanks for sharing.
ReplyDeleteYour cards are totally divine!! I love them both !! But especially the fish - really love the fish card, and the shaker idea is awesome!! Thank you for all the tips and hints, I will definitely be using some of these ideas at my next shaker class!!!
ReplyDeleteThe first card was amazing and then you had two! Oh my, awesome samples of shaker cards. You even make Pacific Point look fantastic :) :) :)
ReplyDeleteFantastic shaker cards, Liz. The variations are fabulous, and I'm so glad the little flower was stuck facing the right way.
ReplyDeleteOh, I love shaker cards and yours look great!! I really like the idea of adding beads (raiding stash for next card!!).
ReplyDelete