Welcome to this week's bloghop - and of course it's not #08 - we're up to #18, how amazing!
What a gorgeous inspiration picture this week.
It's not hard to be inspired by pinks, but the card I finished up with is nothing like what I had initially planned to make. I love the bricks, the mass of flowers, the pink and of course the vesper.


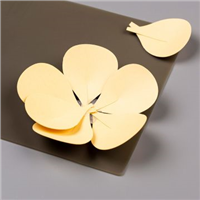
This card uses a different technique which is not too tricky but takes a bit of practice using your own bigshot to work out the best thickness of layers. I was sent a gorgeous card using this technique by the talented Heather McCarthy after Onstage last year, and she actually entered that card in the very first Colour Inkspiration Pre-challenge when we first kicked off. She has a great video with the instructions and I'll post the link below. It involves using the So Detailed Thinlits Dies as an embossing folder rather than a cutting thinlit [EDIT: Ok so I must confess I just discovered that these thinlits are now discontinued, so I apologise for that but there are many detailed thinlits in the Stampin Up arsenal which would work just as well with this technique] It also uses a very different sandwich. Heather recommends
- take out the thin die adaptor
- layer 1 a acrylic plate
- layer 2 thin card shim (1 or 2 depending on your machine) eg the backing card from the DSP stacks
- layer 3 silicone craft sheet
- layer 4 your piece of cardstock to be embossed - whisper white/very vanilla (9.8cm x 14.1cm)
- layer 5 the thinlits die (cutting surface face down as normal)
- layer 6 acrylic plate
To create this card I have taken the resultant beautiful white embossed panel, fussy cut along the top edge and sponged it with Powder Pink first using sponge daubers, then add a soft layer of Sweet Sugarplum sponged in a circular motion in the centre of each of the main blooms. And lastly added a faint wash of wild wasabi using the aquapainter in the valleys between some of the raised blossoms.

The multcoloured brickwork is achieved using another technique I have described before (but i can't find the link to it atm...).Those leftover scraps from your new sets of red rubber stamps can come in handy. I have taken a rather large piece and mounted it onto an old wooden block and I use this instead of a sponge to apply a layer of ink. It gives a burnished look and works well when you want to blend two different colours of ink. The brick embossing folder works particularly well for this technique, and I've blended both Basic Gray and Sahara Sand (stamped off a little first) to get that old brick look. ( I do love the pink pavers in the picture but that might have been a bit much on the card don't you think?)


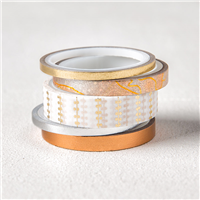
The copper trim is the gorgeous thin washi from the new Year of Cheer Specialty Washi tape and the sentiment is from the Wood Words set.

Up next week is Jacque, and her gorgeous style will be well suited to these colours. Be sure and hop all the way around for some brilliant inspiration, and don't forget you have 2 weeks to create your own card using the challenge colours and post it to the Facebook page. have fun!

thanks so much to Heather's "So Detailed Thinlits Embossed"
Have a creative week!
Thanks for looking, and remember
"don't just post online,
post something pretty!"
Liz


Such beautiful, pretty sponged flowers Liz! I love a brick wall on a card! Kelly x
ReplyDeleteThansk Kelly, me too!
DeleteVery pretty flowers with the sponging, I've just tried this embossing with dies, it has a fun & different look.
ReplyDeleteyes it's a great way to use things differently
DeleteLovely balance of the colours Liz and such beautiful texture. Clever use of die embossing too! Xx
ReplyDeleteThanks Nikki, so great to learn from others
DeleteLove the delicate embossed look using the thinlits - very clever.
ReplyDelete
DeleteThanks Bron
Wow Liz. Such a gorgeous card. 2 fab techniques I have to try!
ReplyDeleteyes Lou, you'll be surprised how much fun it is
DeleteYou've put a lot of work into this gorgeous piece of art & it shows, Liz. I love those softly coloured flowers. I've also learnt quite a bit reading through your post, thanks for taking the time to explain how you went about creating. Just beautiful. x
ReplyDeletethanks Patrice, my pleasure. Hope you give it a go
DeleteGorgeous sponging. What a lovely way to do the flowers. Thankyou for all the awesome tips. I love your bricks too.
ReplyDeleteVery pretty and delicate. Great tips re: sponging the flower detail, and the stamping on your embossed brick wall. D xox
ReplyDeleteAbsolutely beautiful card, Liz. I love the embossed, fussy cut and sponged floral panel, and that you used an entirely different form of embossing and colouring for the brick wall. Very creative! Love the copper washi, such a lovely addition. Thanks for sharing details on how you achieved your wonderful creation.
ReplyDelete