Well in a little bit of amazingness I was invited to be a presenter at #onstage2018 in Brisbane. I was given the gorgeous Needlepoint Nook suite to present and had such fun playing with it. I feel so honoured to have been given such an amazing opportunity and very grateful for all the support that Stampin' Up! gave me.
I have created lots of different samples and will be showing them to you over the next few days.
Stampin' Up! wanted to bring embroidery to stamping and so they created the designs and took them to an embroiderer who worked her magic with needle and thread. The finished pieces were photographed and that became the basis for both the DSP and the Stampset. In a first the Photopolymer set is DistINKtive so you can actually see the threads and the fine detail in the stamps.
IMPORTANT TIPS FOR PHOTOPOLYMER DISTINKTIVE STAMPS




I hope you have a creative week and remember, I challenged everyone there to pick one card from their stash, pick one friend to post to, and send some handmade happiness THIS WEEK!
If you need someone to post to
send one to me-
I'll always write back
Liz Gross
39 Brecknell St,
The Range, Qld 4700
I have created lots of different samples and will be showing them to you over the next few days.
Stampin' Up! wanted to bring embroidery to stamping and so they created the designs and took them to an embroiderer who worked her magic with needle and thread. The finished pieces were photographed and that became the basis for both the DSP and the Stampset. In a first the Photopolymer set is DistINKtive so you can actually see the threads and the fine detail in the stamps.
IMPORTANT TIPS FOR PHOTOPOLYMER DISTINKTIVE STAMPS
- dark inks will give a much crisper image than pastel inks
- experiment with all your inkpads, some will simply work better than others
- you need a very LIGHT TOUCH both when applying the ink and when stamping
- the fine surface does not have much space for surplus ink, so if your inkpad is too juicy the grooves will easily fill with ink and you won't get a clear image.
- for the same reason you need to clean the surface of the stamp (with your shammy) between EACH time you apply ink to the stamp surface
- if you apply too much pressure when stamping you are less likely to get a crisp image
- try applying the ink using a sponge dauber- you might like to use the stamparatus so that you can stamp layers of ink and get the depth of colour you are happy with
- try the UNINKED STAMPING SPOTS for brilliant ink coverage. Don't make them too juicy when inking them up. The small surface is great for applying ink to the stamp rather than pressing the stamp into the soft foam inkpad surface.
- THIS SET is a 2 step layering stamp, so check the acetate sheet and mark your stamps with a sharpie where the arrows line up with the stamps- that way you can layer your stamps in the right direction when putting ink to paper.
- also the Framelit has a little arrow which matches for when you cut out your flowers.
Hope that makes sense, any questions please get in touch.
This set is designed with the Avid card maker in mind but is perfectly suited to the beginner.

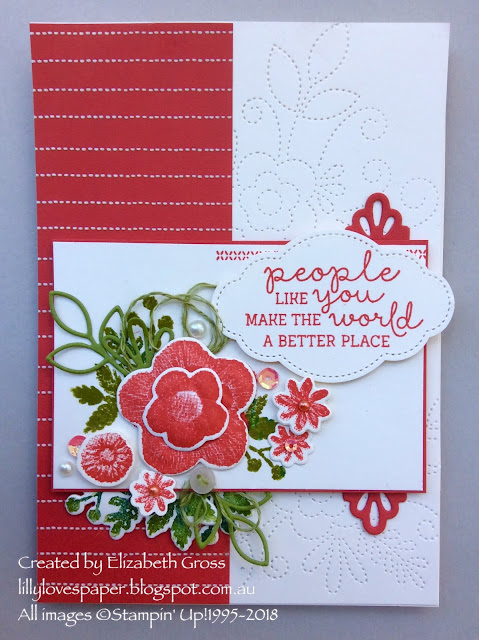
Just 2 tones of ink, a strip of DSP, and some simple stamping on the envelope.
The casual stamper will not own a Bigshot but will love the versatility of this set coordinating with the existing Pretty Label Punch.

Additional tools - scored straight lines for texture, stamped panel is raised up on a mat, pretty label punched sentiment with frame and embellishments attached with glue dots.
My avid crafter sample has texture embossed background, label, layered flowers and added embellishments.


And here they are all together with an additional avid sample - a shaker card - it uses the medium sized flower and the little leaves from inside the leaf spray/frond

I'll have lots more samples over the next few days, including the gorgeous folding Ferrero Box which looks beautiful using those DSP pages. So make sure your subscribe to the email for this blog to see all the samples.
It was pretty scary in front of all those Demonstrators, but I learnt a lot from the experience.

I survived!!

Thanks to this amazing woman for her faith, generosity, positive energy and enthusiasm

I hope you have a creative week and remember, I challenged everyone there to pick one card from their stash, pick one friend to post to, and send some handmade happiness THIS WEEK!
If you need someone to post to
send one to me-
I'll always write back
Liz Gross
39 Brecknell St,
The Range, Qld 4700
"don't just post online,
post something pretty!"
cheers, Liz
Fabulous samples, Rachel! Congratulations on getting to do the presentation.
ReplyDeleteOops - I think I just used the wrong name - sorry, Liz!
ReplyDelete