Partial Die Cutting is a very effective technique and the effect looks much more complicated than it really is.
I had a request for a tutorial so I made a second version and took lots of photos.
When the card is closed it can look like the large heart is on the front of the card.


I created these cards for CASEing the Catty last week, and the Lovely Lipstick version uses the same technique.

You can use this technique for many different framelits.
I do have a post from long ago using letters across the top of a folded card.
You can view that here.

Product List
I had a request for a tutorial so I made a second version and took lots of photos.
When the card is closed it can look like the large heart is on the front of the card.

The window appears when you open it.

1.Cut blueberry cardstock to 21 cm x 14.7cm and score and 10.5cm.
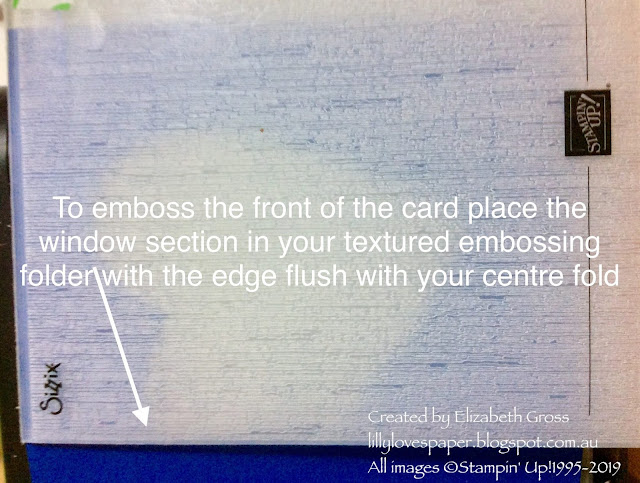
Place the framelit on the card front with the majority of the shape on the front but extending over the central score line / fold line .

2. Position the bottom plate as normal but position the top cutting plate with the straight edge along the centre fold line. Hold in place with post-it notes if desired

3. Run this through the Big Shot

4. Emboss the front of the card ( the window frame) using the Subtle Embossing folder if desired.

5. Cut a Whisper White panel 14.7cm x 10 cm. You can trim or decorate one long edge if desired. You also need to cut one more large heart from your chosen DSP, and a scallop frame from another . I used Soft Sea Foam cardstock and added some sponging using Soft Sea ink and a sponge dauber to add more depth.

6.Adhere the whisper white panel to the inside of the card.
Adhere both the blueberry heart and the scallop frame making sure they are sitting together nicely and laying flat. Keeping them attached to the card makes the large heart stand up a little higher and keeps all the edges neat.

7. Adhere the DSP heart and the scallop frame over the blueberry shapes.
Decorate the front of the card as desired. I tied 2 strands from the White flax ribbon around the card, I stamped the sentiment and punched it out with the Pretty Label Punch and sponged the edges. I fussy cut a few fronds from the DSP and punched a small butterfly. I finished it all off with a few sequins.

8. Lastly, fold the smaller edges of the heart and scallop frame to the back of the card and adhere in place.


The flowers are all fussy cut from the DSP, the sentiment from Meant to Be is stamped in Flirty Flamingo, and the coordinating lacy embellishment behind is from the Doily Builder Thinlits Dies.(page 47)
I do have a post from long ago using letters across the top of a folded card.
You can view that here.
Please feel free to create your projects using this technique, send me a message if you have any creations to share and Please refer back to this blogpost for more details. There is a full tutorial on Cooberrie park.
I hope you have a creative week and remember,
"don't just post online,
post something pretty!"
cheers, Liz
Product List


 Flax Ribbon")


That's a great tutorial Liz, and I love the blueberry colour for this card.
ReplyDelete